
Introduction
In my earlier article I discussed my experiences with the Amazon EC2 instance. I also talked about the VPNs and security groups that are needed to set up the network at which the EC2 virtual machine resides. Today, I will detail my approaches to getting network traffic to the virtual machine.
Routing Architecture
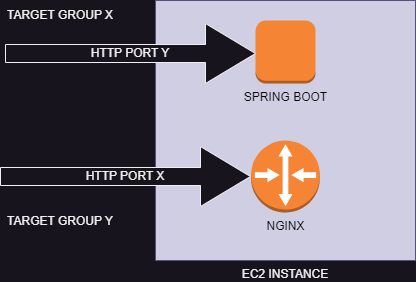
In my simple scenario, I am using the same EC2 instance to host my Nginx router (which serves my Angular resources for the front-end) and the Spring Boot service which runs the Hymns API. The Nginx server listens to port X and the spring boot service listens to port Y. Both service use the HTTP protocol.
Target Groups
Target groups are what AWS uses to know where to route traffic to. After AWS determines the IP address, it need to know which port and protocol to use to send the data packets. This is what a target group provides.
The Big Picture
I plan to build many applications in future, as well as APIs that other developers can use to collaborate with. I will be using mariarch.com to serve web applications and pages, and mariach.io to serve collaboration APIs. Although the routing solution I will start with will be simple, I will have to bear this in mind so that my system can evolve appropriately.
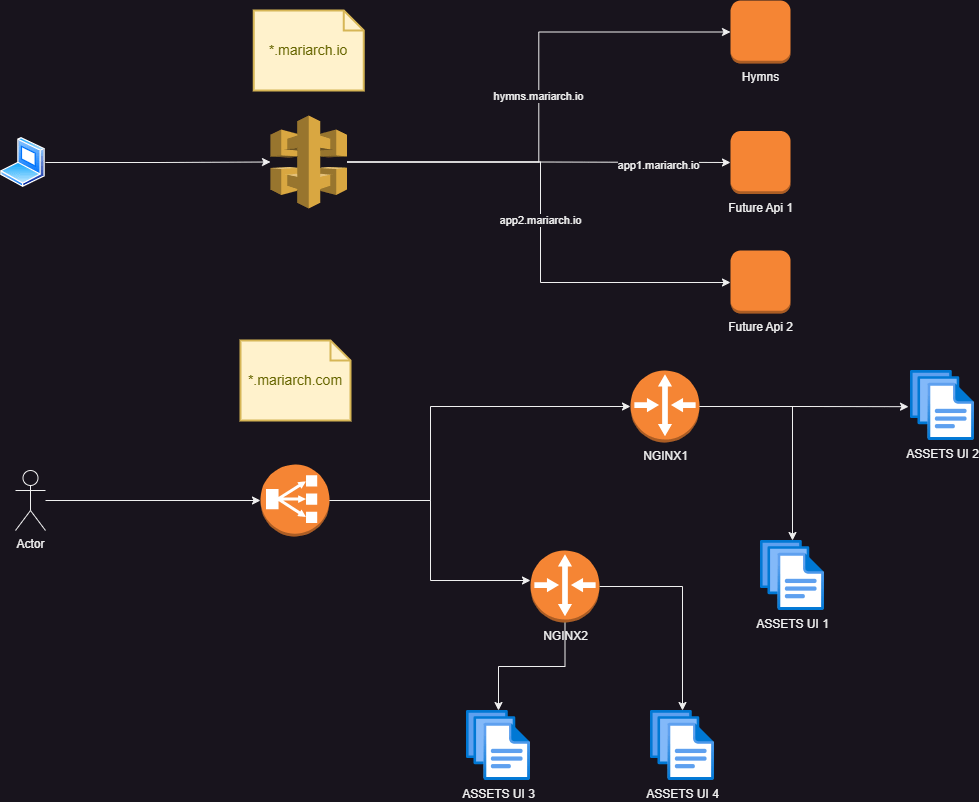
Flow for API Traffic
- Client makes an API call
- The request reaches an API gateway
- The API gateway routes the requests based on the sub-domain to the required target group
- The request reaches the target group.
Flow for User Interface Traffic
- Client loads a page on the browser
- Requests from the browser are received by a load balancer
- The load balancer routes the request based on domain to the required target group
- Target groups define the port and protocol that an Nginx server listens to
- An Nginx server can be configured to host multiple applications and will contain rules to serve the correct asset based on the subdomain used in the request
- The Nginx server returns the requested access.
Api Gateways with Amazon API Gateway
This is by far the most feature backed approach to take and also, not the simplest to configure. AWS provides two categories of HTTP traffic routing that you can use: The HTTP api and the REST api. I was initially confused as to the difference between these two offerings and, on studying the documentation of these features I got to understand their peculiarities. I will briefly summarize them below.
HTTP APIs only provide basic routing and you can create APIs based on region. You can configure these apis to use Mutual TLS authentication (HTTPS), and authorize using IAM, amazon cognito, custom authorization using AWS lambda functions and JWT tokens. You can also use custom domains on these APIS.
Rest APIs build on all the features of HTTP APIs and they can be edge-optimized and private. You can set up these apis to use certificate authentication or authenticate using AWS’s custom WAF (Web Application Firewall). You can also configure resource polices to achieve fine grained authorization. Also, you can create API keys that your API clients will authenticate with and enforce rate limiting and throttling per client. Please see the developer guide for more details about these two offerings.
Typical AWS Api Gateway Configuration

The typical way to configure AWS API Gateway is through a network load balancer. AWS provides a detailed guide on how to do this and I happened to follow the same with no issues.
Simple API Gateway Using Application Load Balancers
Using the AWS API gateway will surely give you the most flexibility and will enable you to achieve much more without writing code. But this requires an extra component which will eventually add to your overall costs. If you don’t require the features that the API gateway provides (like me at this point who only wants a simple routing by sub domain name), you can simply use an application load balancer. It enables you to specify basic routing rules. In my case, I am using the application load balancer to route traffic by domain name.

Network versus Application Load Balancers
AWS provides different categories of Load Balancers of which application and network load balancers are the recommended and most popular. Network load balancers route traffic at the network level (i.e it uses protocols like TCP and UDP). This means that the rules you specify here are network related. Application load balancers, on the other hand, route traffic on an application level (using protocols like HTTP, HTTPS, e.t.c). This enables you to route based on HTTP related criteria like path, headers e.t.c.
Transport Layer Security (TLS) and Certificates
Users will not trust you when you do not use https (I mean, I get skeptical when I navigate to a site without https). Even worse are HTTPS sites that are flagged with the dreaded “certificate invalid” or “site not trusted” messages. These messages are related to the certificate used to establish the secure connections.
AWS API Gateways and load balancers allow you to listen to secure endpoints by associating a certificate with them. AWS gives you an easy way to create and manage public certificates. These certificates are signed by AWS certificate authority and will show up as a legitimately signed certificate (check hymns.mariarch.com which was signed by a public AWS certificate). Certificates provided by AWS are managed using AWS certificate manager. This services allows you to create public certificates for free and will not charge you for using public certificates. You can decide to associate multiple domain names to a certificate or use wildcards. Please note that when creating certificates with AWS certificate manager, you will be required to validate the sub-domains associated with those certificates. Again, AWS provides a detailed, step-by-step, process on how to do this which involves associating a few domain records to your domain. If your domain is managed by AWS using Route53, it’s much more easier.
One thing to note using AWS public certificates is that:
- They are signed by AWS Certificate Authority
- You can only access the certificate details
- You can not access the private key of the certificate.
This effectively means that you can not use these certificate to secure any component apart from those that are natively integrated to AWS certificate management (i.e API gateways and load balancers). I learned this the hard way when trying to route traffic directly to my EC2 instance (you don’t have access to private keys of these certificates to configure any deployed service like nginx for http).
AWS Private certificates give you much more control and freedom to use any Certificate Authority of your choice. It also gives you access to the private keys as well. And, as you guessed it, it is not free. Please see the AWS documentation for certificate management for more information.
Routing Traffic Directly to EC2 Instances
Like you know, this is the simplest approach because it does not require any extra component from AWS. We just need to:
- Add network rules to the security group to permit traffic from the IP addresses you want ( you can permit all, but this is discouraged)
- Run a service that listens to a particular port. The default port for http is 80, that for https is 443 (If you want your urls to be without a port, you should use these defaults).
- To use TLS, you will need to use an AWS private certificate or obtain a certificate from an external provider.
This option, on its own, is discouraged because that the network interfaces of the EC2 instances are exposed directly. However, this can be a viable option of you already have routing providers outside of AWS. In this case, your network rules should only allow traffic coming from these routing providers.
So interesting right? Now that I have looked at routing traffic, I will circle back to securing APIs using Amazon Cognito in the next post.

Leave a comment